

Webhooks
The ME E-Procurement platform offers webhooks so you can be notified about events that occur on the platform.
Webhooks are a technology for transmitting real-time notifications between two software systems.
All issues related to logs (continuous records with date and time of the event), key generation, and management of events notified via webhooks from our APIs are handled in the Partner's Portal.
With webhooks, you can be notified about events that happen within ME’s E-Procurement, whether you are a buying client or a supplier, for example:
- Order received by the supplier;
- Request approved;
- Pre-order approved;
- Service registration sheet approved;
- Results of integrations with all our public APIs. These results can be entities successfully created with their generated IDs or integration errors.
Webhook Types
The platform offers two types of webhooks to accommodate different integration scenarios:
1. Traditional Webhook (Callback)
The traditional webhook works with the "push" model, where Mercado Eletrônico sends real-time notifications to an HTTP endpoint configured by the client.
Characteristics:
- Communication flow: ME → Client (ERP)
- Requirements: Client must expose an HTTP/HTTPS endpoint accessible from the internet
- Delivery: Immediate when the event occurs
- Ideal for: Clients with infrastructure prepared to receive external HTTP requests
2. Bucket-type Webhook (Polling)
The Bucket-type webhook works with the "pull" model, where events are stored in a "bucket" and the client actively fetches these events when desired.
Characteristics:
- Communication flow: Client (ERP) → ME
- Requirements: Only the ability to make HTTP requests to the ME API
- Delivery: On-demand, when the client queries the bucket
- Ideal for:
- Clients who cannot or do not want to expose HTTP endpoints
- ERPs with firewall or security restrictions
- Legacy systems without the capability to receive webhooks
- Environments with lower technical maturity to support callbacks
Webhook Registration
❗️ Prerequisite:
If you don't yet have access to the Partner's Portal, go to the Credentials page.
To register Webhooks, go to Partner's Portal > Webhooks (the Webhooks item in the top menu).
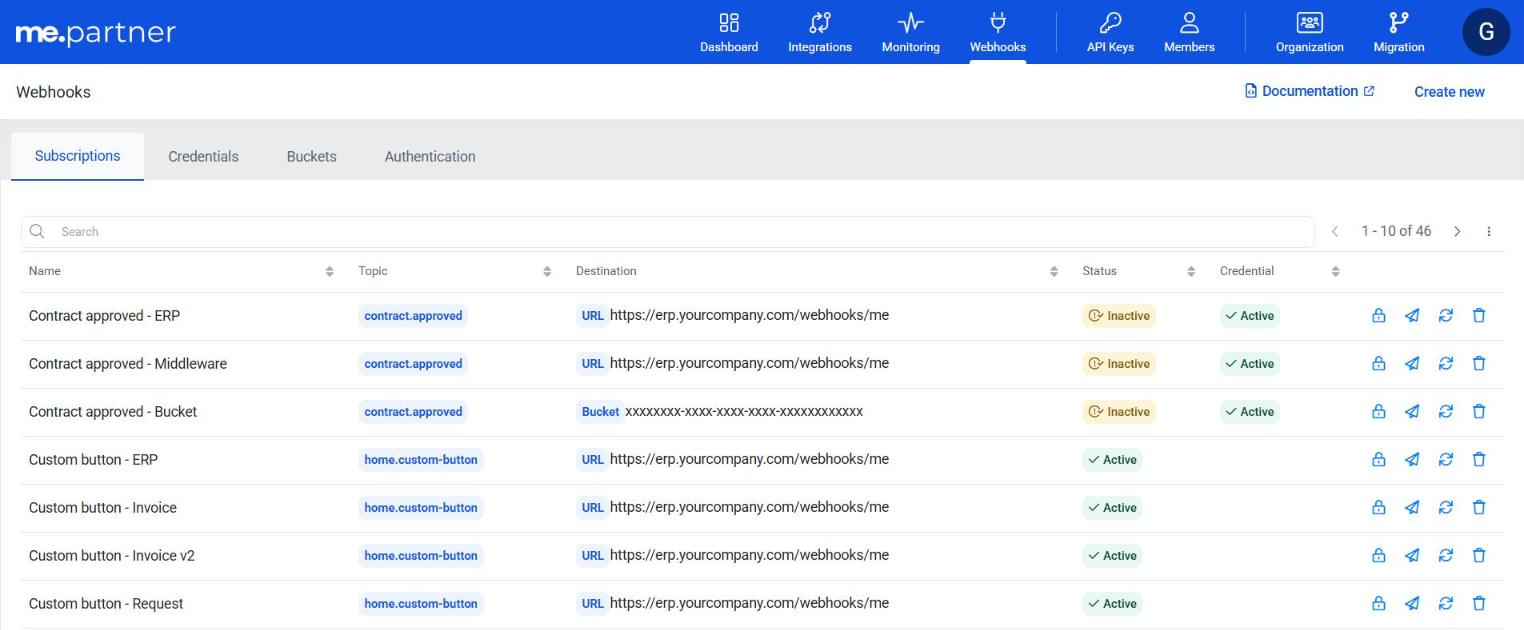
The screen is organized into four tabs: Subscriptions, Credentials, Buckets, and Authentication.
Step 1: Credential Creation:
Using credentials in webhooks is optional but highly recommended for clients who want to increase security in integrations, ensuring that only authorized systems receive ME notifications.
Credentials allow the client application to be validated before receiving any event, preventing unauthorized access and maintaining the integrity of the transmitted information.
To register a credential, go to the Credentials tab and click the Create new button below the credentials list. The Add credential form will open. In the list, each credential can be edited (pencil icon) or deleted (trash icon).
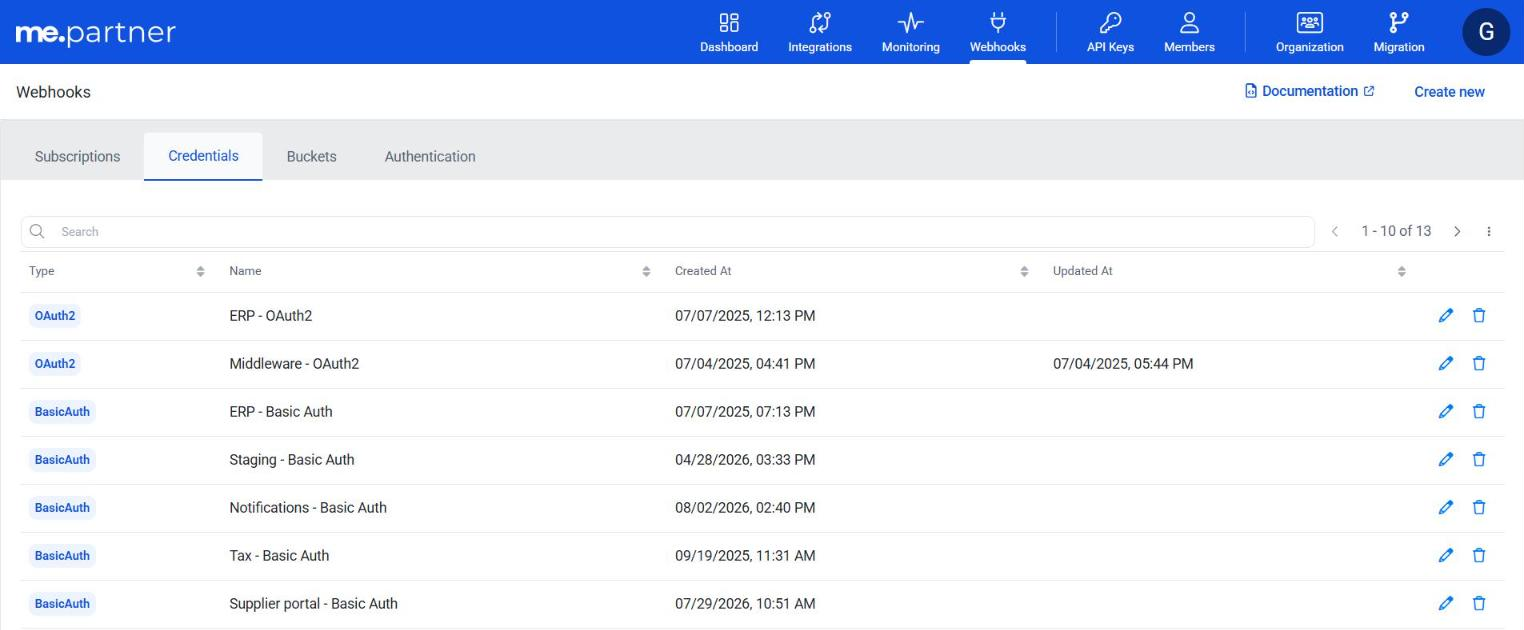
We offer two types of authentication: Basic Auth and OAuth2. Below are the differences between them:
Basic Auth:
With Basic Auth, the system sends username and password (or ID + Secret) encoded in Base64 in the request header.
Example of a request header:
Authorization: Basic dXN1YXJpbzpwYXNzd29yZA==
Typical use:
- Simple integrations;
- Legacy environments;
- When the provider does not offer OAuth2.
Limitations:
- Less secure: credentials are static and must be protected with great care.
- No automatic expiration: if leaked, they can be used indefinitely.
How to fill in: enter a Name, select the
Basic AuthType, and fill in Username and Password (all required).
OAuth2:
OAuth2 uses a token grant flow. First, the system obtains an access_token (based on client_id, client_secret, grant type, etc.). In ME’s case, it is based on client_secret. Then, each request uses a token like this in the header:
Authorization: Bearer eyJhbGciOi...
Typical use:
- Modern integrations;
- APIs that follow OpenID Connect, Keycloak, Auth0, Azure AD, etc.
Advantages:
- Tokens expire automatically (lower risk if leaked);
- Supports scopes (granular permissions);
- Much more secure and recommended for corporate/B2B environments.
Quick Comparison between Basic Auth and OAuth2
| Item | Basic Auth | OAuth2 |
|---|---|---|
| Form | Fixed username + password | Temporary tokens |
| Security | Low (static) | High (tokens expire) |
| Complexity | Simple | More complex to configure |
| Recommended for | Legacy systems, simple internal integrations | Modern integrations, exposed APIs, corporate environments |
How to fill in an OAuth2 credential?
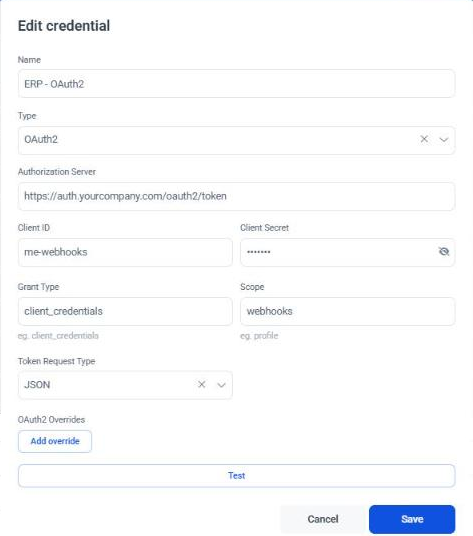
Fill in the fields on the OAuth2 credential screen as follows:
Name (required, 3 to 255 characters): Internal label to identify the credential. Use a clear name to know which integration is using it, e.g., keycloak, me-app, auth-mercadoeletronico;
Type (required): Defines the authentication protocol. Select
OAuth2;Authorization Server (required): URL of the Authorization Server responsible for issuing the token (must be a valid
http://orhttps://URL). Provide the IdP token URL (Identity Provider, e.g., Keycloak, Auth0, Azure AD). In Keycloak, it usually ends with /auth/realms/{realm}/protocol/openid-connect/token;Client ID (required): The public identifier of the application registered in the IdP. Copy the Client ID registered in Keycloak (or another IdP). Example: me-webhooks-integracao.
Client Secret (required): The private key associated with the Client ID. Paste the secret generated in the IdP.
Grant Type (optional): Free-text field that defines the OAuth2 flow used to obtain the token, sent in the
grant_typeparameter. How to fill in:client_credentials→ when authentication is machine-to-machine (APIs, backend integrations). This is the value suggested by the field itself.authorization_code→ when it involves interactive user login.
Scope (optional): Defines the privileges associated with the token. Provide the scopes the application needs. Example: profile, openid, email, or a custom scope defined in the IdP.
Token Request Type (required): The way the parameters (
client_id,client_secret,grant_type, andscope) are sent in the token request. The options are:URL Encoded Form→ most common (sent in the body via application/x-www-form-urlencoded).JSON→ sent in the body as application/json.Header→ each parameter is sent as a request header.
OAuth2 Overrides: Optional. Click Add override to add a row with the Type, Key, and Value fields (and a button to delete the row). Use it when the IdP uses field names that differ from the OAuth2 standard:
- Request → renames a parameter sent in the token request. In Key, enter the standard name (e.g.,
client_id) and in Value, the name expected by the IdP. - Response → renames a field of the IdP response. In Key, enter the name returned by the IdP and in Value, the standard name (e.g.,
access_token).
If not needed, leave it without overrides.
- Request → renames a parameter sent in the token request. In Key, enter the standard name (e.g.,
Test Button → Becomes available after filling in Authorization Server, Client ID, Client Secret, and Token Request Type. Performs the authentication call with the filled-in data to validate if the token is issued correctly. Test result shows the equivalent
curlcommand, whetherAccess TokenandExpires Inwere returned (OK or N/A), and the full IdP response.
After filling in the fields, click Save and your credential will appear in the list of registered credentials.
Step 2A - Bucket Creation (For Bucket-type Webhooks):
ℹ️ Note
This step is required only if you wish to use Bucket-type webhooks (polling). If you're going to use traditional webhooks (callback), skip to Step 2B.
Buckets are containers that store events to be consumed later through polling. Before creating a Bucket-type webhook, you need to create the bucket where events will be stored.
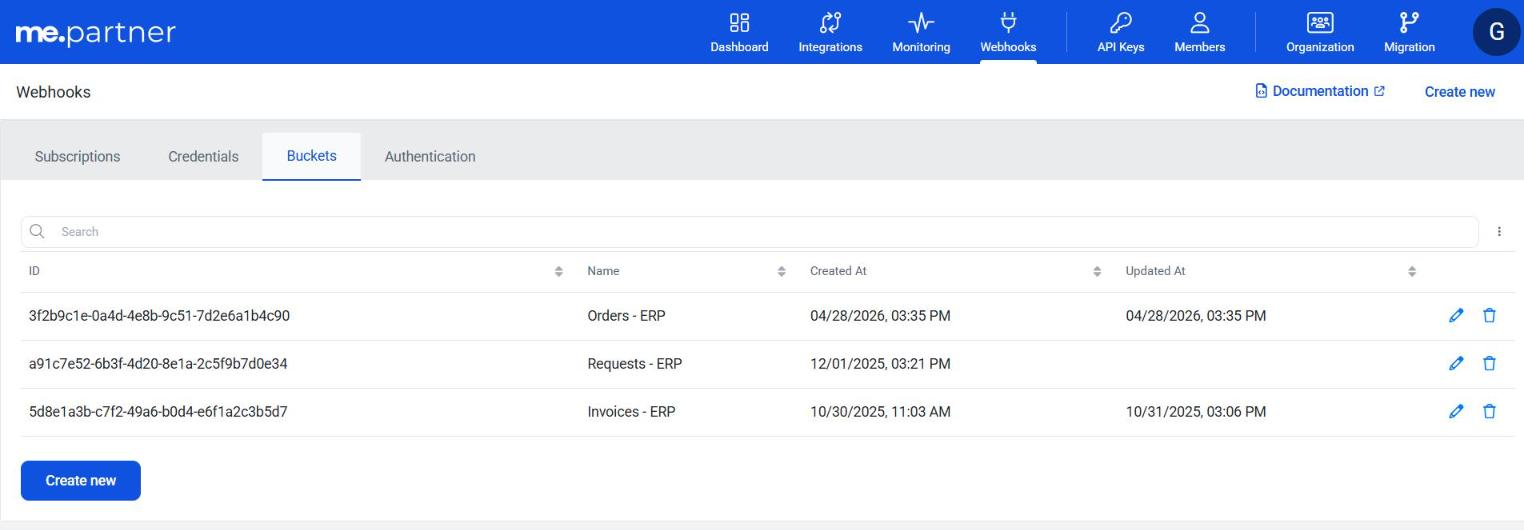
How to create a Bucket:
- Go to the Buckets tab in Partner's Portal > Webhooks
- Click Create new, below the buckets list. The Create new bucket form will open.
- Fill in the fields:
- Name (required, 3 to 255 characters): Bucket identification (e.g., "ERP Orders Bucket", "Purchase Events")
- Click Save
After creating the bucket, it will appear in the list with its ID (Bucket ID), which will be used when querying events. When creating the subscription, the bucket is selected by name. In the list, each bucket can have its name edited (pencil icon) or be deleted (trash icon).
Step 2B - Subscription Creation:
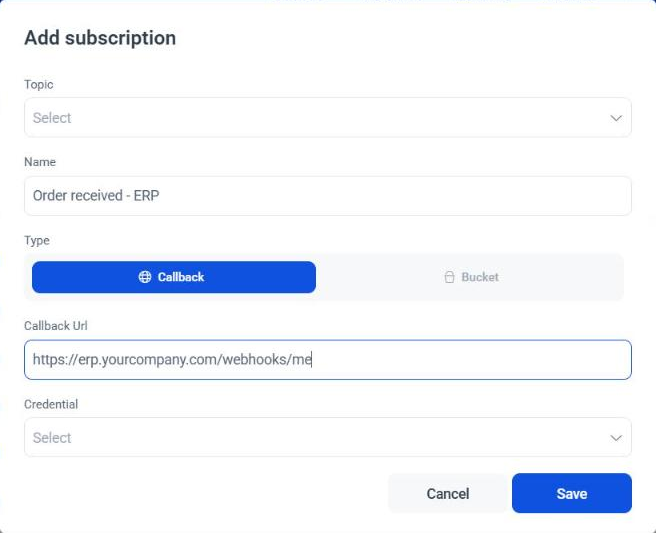
- Click on the Subscriptions tab.
- Click Create new, in the top-right corner of the Webhooks screen. The Add subscription form will open.
- In Topic (required), choose the event you would like to receive alerts for. There are some predefined events, for example:
- Notify when an order has been received by a supplier (
Order Received), or when a request has been approved in the portal (Request Approved). - In addition to these events, the user can choose to be notified of all integration results from the portal (
Integration Result).
- Notify when an order has been received by a supplier (
- Give the subscription a Name (required, at least 3 characters).
- Choose the webhook Type using the Callback / Bucket switch:
- Callback: For traditional webhooks, fill in the Callback Url field (required) with your API address. The URL must start with
http://orhttps:// - Bucket: For polling-type webhooks, select the Bucket created in the previous step (required)
- Callback: For traditional webhooks, fill in the Callback Url field (required) with your API address. The URL must start with
- Select the Credential (optional, but recommended for Callback-type webhooks)
- Click Save.
After saving, the subscription appears in the list with the Name, Topic, Destination (the callback URL or the bucket ID), Status (Active/Inactive), and Credential columns. A subscription cannot be edited after it is created; the actions available on each row are:
- Credentials (lock icon): links, changes, or removes the subscription's credential;
- Send test: sends test data simulating the topic's event (Test your settings form);
- Resume/Suspend: suspends or resumes sending notifications for the subscription;
- Delete: removes the subscription.
ℹ️ Note
Subscriptions created automatically by an integration (Integrations menu; the subscription name starts with
integrationhub-) cannot be changed from this screen. When you try one of these actions, the portal shows the message "Unable to perform this action." stating the integration the subscription is linked to.
Viewing Sent Notifications
Sent notifications can be viewed on the Partner's Portal events screen (partner.me.com.br/monitoring/events). It is under Monitoring > Events.
In the list, you can filter events by Date, Webhook status, Operation result, and Topic, and search by fields such as Key, Event Id, and Webhook Id. Click an event to expand its details.
In this example, we will show a notification of the integration.result topic (Integration Result), opened in the Event Log screen.
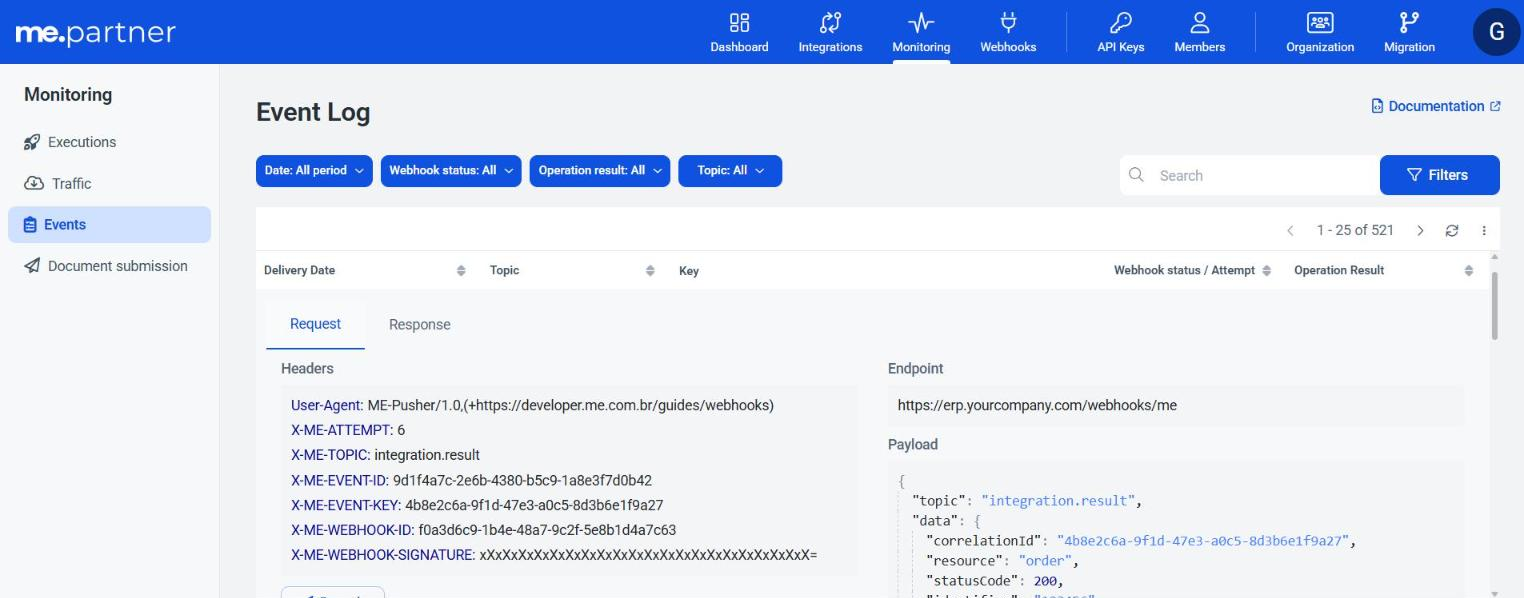
Below we highlight the main fields of the event: the list columns and the endpoint (1), the headers (2), and the payload (3). Headers, endpoint, and payload are in the Request tab of the event details. For Callback-type webhooks, the Response tab shows the HTTP status, headers, and body returned by your endpoint (and, on failure, the error details). The Resend button, in the Request tab, sends the event to the subscription again.
1 - Request Details
| Field | Description |
|---|---|
| Endpoint | The address of your API that was provided in the Callback Url field when you registered the webhook in the Partner's Portal. |
| Delivery Date | Date and time the notification was recorded and sent to your system. |
| Topic | Topic subscribed in the Partner's Portal (e.g. order.created) that triggered the notification. |
| Key | Business identifier of the event on the platform (often the Correlation ID). |
| Webhook status / Attempt | Delivery status of the notification and attempt number (learn more in the following section "Clarification on the Status/Attempt field") |
| Operation Result | Result of the action that generated the event within ME (e.g. order created or rejected due to validation). Internal event notifications, with no operation initiated by you, appear as Event. |
Clarification on the Status/Attempt field
The Webhook status / Attempt field exclusively indicates the result of the attempt to send the notification (webhook) to the client system.
In other words, it shows whether ME was able to deliver the message to the client’s configured endpoint and how many attempts were made.
It is important to highlight:
It does not represent the result of the operation in ME.
Example: if an order was created or a supplier updated successfully in our platform, this information will be in the payload.It represents only the communication with the client.
If it shows Success / 1, it means the webhook was sent and the client’s endpoint responded correctly (HTTP 2xx status).
If it shows Failure / N, it means we tried to communicate the event, but the client’s endpoint did not respond within the timeout or returned an error; if it shows Exhausted / N, ME retried until the configured limit and the event will no longer be resent automatically.
If it shows Pending (with no attempt number), the event has not yet been delivered or consumed.
Thus, if there is a failure or error in Webhook status / Attempt, this does not mean there was a problem executing the operation in ME, but rather that the notification did not reach or was not accepted by the client system.
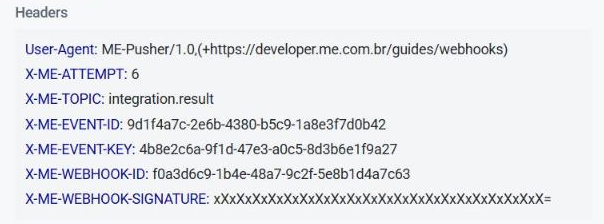
2 - Headers
| Field | Description |
|---|---|
| X-ME-ATTEMPT | Information on which attempt the request is based (see more details above in "Clarification on the Status/Attempt field"). |
| X-ME-TOPIC | Topic selected in the Partner's Portal corresponding to the event to be notified. |
| X-ME-EVENT-ID | Internal identifier of the event in the platform. |
| X-ME-EVENT-KEY | Business identifier of the event in the platform. (In many cases this may be the Correlation Id) |
| X-ME-WEBHOOK-ID | Internal identifier of the webhook that generated the event. |
| X-ME-WEBHOOK-SIGNATURE | Signature of the message payload using the verification token. For more information, see Webhook Authentication. |
3 - Payload
In this section we have a json describing the generated event:
| Field | Description |
|---|---|
topic | Topic selected in the Partner's Portal corresponding to the event to be notified. |
data | Payload of the event generated by the platform. The properties presented here are dynamic and based on the generated event. |
| For more information about events and payload examples, see Overview. |
Webhook Authentication
ME uses a hash-based message authentication algorithm (HMAC) with SHA-256 to generate signatures. To avoid possible downgrade attacks, it is important to discard any message that does not match a valid signature.
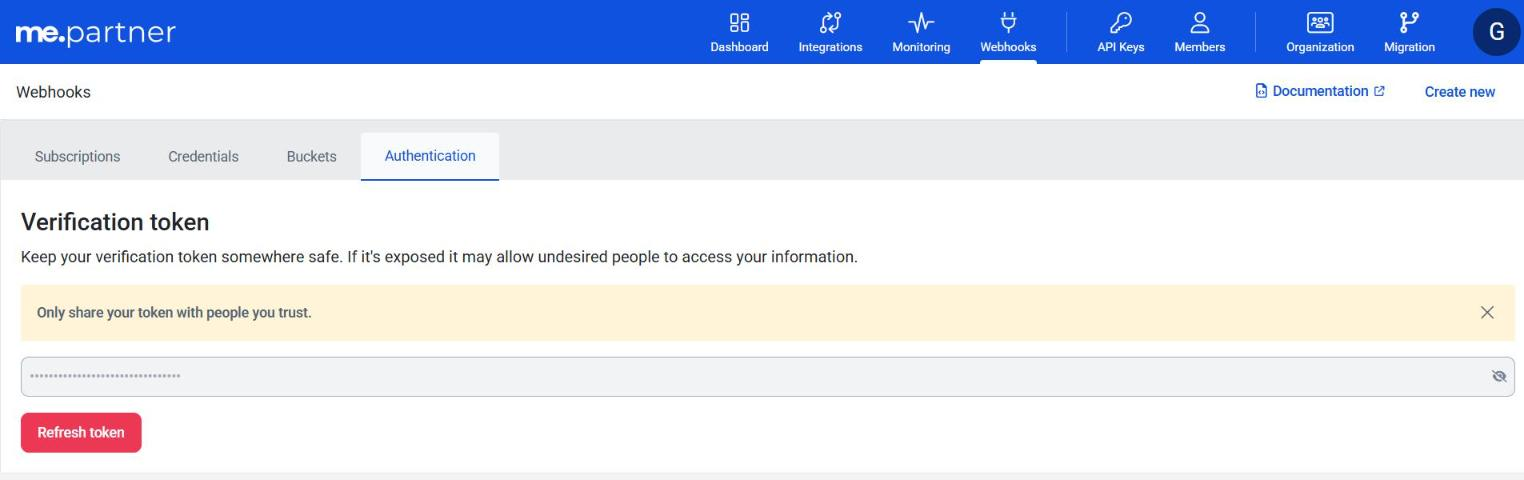
In Partner's Portal > Webhooks > Authentication you will find your Verification token. Click the eye icon to display the token. To generate a new token, click Refresh token and confirm the operation; the new token is then displayed and must also be updated in your system.
❗️ Warning
The provided token will be used as the key in generating the signature. It is important to ensure that this token is kept secret and properly protected, as it is essential for verifying the authenticity of received messages. Keep the token in a safe place and do not share it with unauthorized third parties.
Verifying Signatures
Step 1 - Extract the X-ME-WEBHOOK-SIGNATURE header
At this stage, you must store the hash value received in the request header. This will allow you to later compare this value with the calculated hash to verify the integrity of the received message.
Step 2 - Determine the expected signature
At this stage, you must calculate the HMAC SHA256 of the request payload using the "Verification Token" as the key. HMAC SHA256 is a secure hashing algorithm that ensures data integrity.
Step 3 - Compare the signatures
At this stage, you must compare the received signature with the generated signature. If the signatures differ, you should reject the request, as this indicates that the integrity of the data may have been compromised.
Example written in C#
using Microsoft.AspNetCore.Builder;
using Microsoft.AspNetCore.Http;
using System.Security.Cryptography;
using System.Text;

var app = WebApplication.Create();

const string SharedSecret = "YOUR_VERIFICATION_TOKEN_HERE";

app.MapPost("/webhook", async (HttpContext context) =>
{
    string receivedSignature = context.Request.Headers["X-ME-WEBHOOK-SIGNATURE"];
    string webhookContent = await context.Request.ReadAsStringAsync();

    if (!VerifyWebhookSignature(webhookContent, receivedSignature))
    {
        await context.Response.WriteAsync("Invalid signature. The webhook may have been tampered with!");
        context.Response.StatusCode = 400;
        return;
    }

    // The signature is valid, process the webhook
    await context.Response.WriteAsync("Webhook received successfully!");
});

bool VerifyWebhookSignature(string content, string receivedSignature)
{
    using HMACSHA256 hmac = new HMACSHA256(Encoding.UTF8.GetBytes(SharedSecret));
    byte[] signatureBytes = hmac.ComputeHash(Encoding.UTF8.GetBytes(content));
    string calculatedSignature = Convert.ToBase64String(signatureBytes);
    return calculatedSignature.Equals(receivedSignature);
}

app.Run();
Consuming Bucket Events (Polling)
For Bucket-type webhooks, events are not sent automatically. Instead, you need to actively fetch events through the Mercado Eletrônico API.
How the polling flow works:
- Events are generated: When an event occurs (order created, request approved, etc.), it is stored in the configured bucket
- Client queries the bucket: Your system makes periodic requests to fetch pending events
- Events are processed: Your system processes the received events
- Events are acknowledged: After processing, you confirm receipt (acknowledge) so they are not delivered again
Step 1: List pending events from the Bucket
Endpoint:
GET https://trunk.api.mercadoe.com/v1/buckets/{bucketId}/eventsRequired headers:
Authorization: API authentication tokenContent-Type: application/json
Success response (200 OK):
{
  "events": [
    {
      "id": "7ceb336d-0319-4d95-8d9f-77337b97a671",
      "topic": "contract.approved",
      "key": "1761934555034",
      "payload": {
        "contractId": "125154"
      },
      "createdAt": "2025-10-31T18:15:55.04Z"
    }
  ]
}
Response fields:
| Field | Description |
|---|---|
id | Unique event identifier |
topic | Event topic/type |
key | Business key of the event (can be used as Correlation ID) |
payload | Event data |
createdAt | Event creation date and time |
Step 2: Acknowledge processed events
After processing events, it is essential to confirm receipt so they are marked as consumed and are not returned in future queries.
Endpoint:
POST https://trunk.api.mercadoe.com/v1/buckets/{bucketId}/events/ackRequired headers:
Authorization: API authentication tokenContent-Type: application/json
Request body:
{
  "ids": ["7ceb336d-0319-4d95-8d9f-77337b97a671"]
}
Success response (200 OK):
{
  "acknowledged": 1
}
Best practices for Bucket polling
Recommended polling interval:
| Scenario | Recommended Interval |
|---|---|
| High criticality (real-time) | 30 seconds to 1 minute |
| Medium criticality | 2 to 5 minutes |
| Low criticality | 10 to 15 minutes |
⚠️ Warning: Do not poll with an interval shorter than 30 seconds to avoid server overload and possible rate limit restrictions.
Viewing events on the Events screen
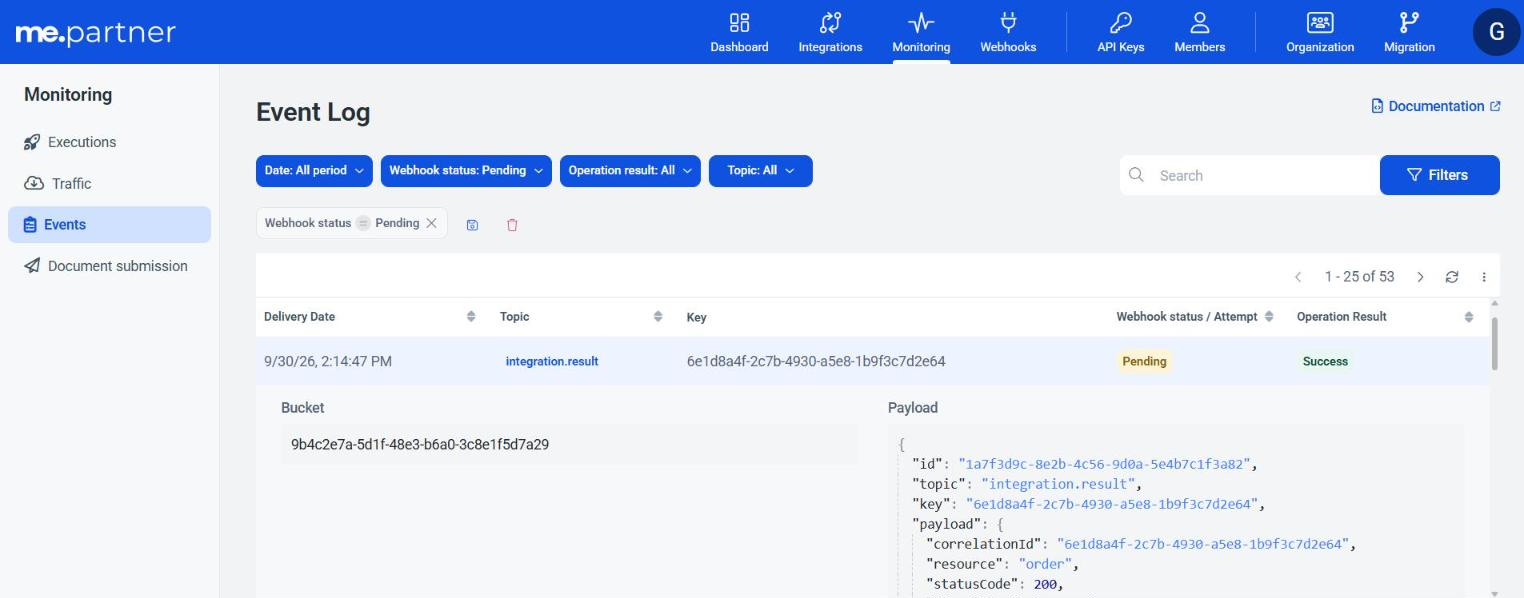
Events stored in buckets also appear on the Partner's Portal Events screen (Monitoring > Events). The displayed Webhook status indicates whether the event was:
- Pending: Event created but not yet consumed
- Success: Event was acknowledged successfully
The details of a bucket event show the Bucket ID and the event Payload.
ME Webhook IP Addresses
ℹ️ Note
This section applies only to Callback-type webhooks. For Bucket-type webhooks, you don't need to configure IP allowlists, as communication is always from your system to ME.
The IP addresses from which webhook (Callback) notifications may originate are:
- 164.152.52.63
Depending on how your integration operates, it may be necessary to add them to an allowlist in your firewall.
Delivery Retry Logic
ℹ️ Note
This section applies only to Callback-type webhooks. For Bucket-type webhooks, there is no automatic retry logic - events remain available in the bucket until consumed by the client.
❗️ Attention
Each attempt to send to the endpoint is recorded. The Webhook status / Attempt field does not reflect the result of the operation in the system, but rather the status of the communication attempt with the client.
If our service encounters problems delivering your notifications (Callback-type webhooks), we will attempt to resend them up to 13 more times, as described below:
- 1st attempt after 5 minutes.
- 2nd attempt after 10 minutes.
- 3rd attempt after 20 minutes.
- 4th attempt after 40 minutes.
- 5th attempt after 1 hour.
- 6th attempt after 2 hours.
- Once a day up to 7 days.
The final attempt will be made 7 days after the initial attempt.
Possible issues in sending notifications:
- If your callback endpoint takes more than 10 seconds to respond. In this case, the attempt is considered failed (Request Timeout).
- If the response from your callback endpoint has a status code other than 2xx.
After a failed delivery, notifications are queued to be reprocessed. If a notification resend fails for 7 days, the notification will be marked as "exhausted" and will no longer be reprocessed.
Not recommended:
- Processing business logic before returning (it may exceed timeout);
- Returning 4XX or 5XX for business rule failures.
Best Practices for the Client:
- Do not process business rules during receipt. Save the message to a queue and respond with 200;
- Always return 200 or 204 when receiving the notification;
- Avoid returning 400/403/500, as they imply a retry by the system;
- Implement signature verification to validate the authenticity of the Webhook using the
X-ME-WEBHOOK-SIGNATUREheader.
Difference between Event Success and Notification Success:
- The fact that an order is successfully created on the platform does not guarantee that the client was notified;
- Notification success = receipt of the Webhook with HTTP 2XX response;
- Notification failure ≠ failure of the original operation.
Event Handling
Proper handling of webhook events is crucial to ensure that your integration’s business logic works as expected.
Handling Duplicate Events
Webhook endpoints may occasionally receive the same event more than once. We recommend that you protect yourself against receiving duplicate events by making your event processing idempotent.
One way to do this is to log the events that have already been processed, and then, based on this log, avoid processing them again.
The X-ME-EVENT-ID field is a unique identifier located in the header of each event and can help with this control:
For information on the Webhooks APIs, go to API Reference > Webhooks API.